No Excuses Bread
Have you heard of Cooking Guy? If not, then you need to check him out. He's three and already rocking the kitchen. Today I'm making my version of his "No Knead Bread". I tweaked the recipe slightly to better suit our family, but it's basically the same.
This is a truly easy recipe, and it's also really, really good.
The first thing I did was assemble my ingredients. This is such a simple recipe, you probably already have everything on hand that you'll need. All of the ingredients are pantry staples.


Just dump your ingredients in a bowl and stir to combine. This is so easy, I think it's going to revolutionize my bread making. I don't always make bread from scratch, not by a long shot, but I do like to make it fairly regularly. Homemade bread tastes amazing, it's really inexpensive, and the ingredients are MUCH better than what's on store shelves so it's significantly healthier. Traditionally made homemade bread has a reputation for being a little tricky, but this! This! How easy can it get? That's why I call this "No Excuses Bread".


After mixing just until it comes together, cover the bowl with a damp towel and let rise 30 minutes.

Then, you can either bake in a well greased cake pan (like 9 x 13) or divide into two well greased loaf pans. I went with my loaf pans, but because I hate to wash dishes, I used parchment paper instead of greasing.


Then, you can either bake in a well greased cake pan (like 9 x 13) or divide into two well greased loaf pans. I went with my loaf pans, but because I hate to wash dishes, I used parchment paper instead of greasing.

Then, pop into a 425 degree oven for 20-25 minutes if you're using a cake pan, or 25-30 minutes for two loaves (the original recipe called for 45-60 minutes, but mine was getting too brown after 35 minutes, so I'd recommend checking it around 25-30 for two loaves). That't it! Delicious homemade bread in no time and with very little effort.
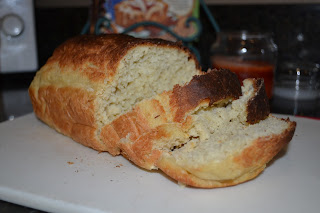

This bread would be great for breakfast, lunch or dinner and I've read that it's outstanding sandwich bread. We're having it tonight with crock-pot spaghetti. I can't wait! It's SOOO good! Thanks Cooking Guy! Oh, and did I mention that this bread only costs .50 to .60 cents a loaf???
Here's the recipe I used.
4 cups flour
2 Tbsp. active rise yeast
2 Tbsp. agave syrup (could use sugar or honey)
2 cups warm water
1 egg
Stir ingredients together, cover with a damp tea towel and let rise 30 minutes. Then transfer to two loaf pans lined with parchment paper and bake at 425 degrees for 25-30 minutes. Remove from oven when golden brown. Let cool slightly and enjoy!
Check out the three-year-old kitchen genius on youtube: https://www.youtube.com/watch?v=yYh_P0JHH8s


